

Every student deserves to access content without barriers. But for too many learners, the documents and digital books teachers create every day put up walls before class even begins. A poorly structured PDF, an image without alt text, a video with no captions — each of these quietly excludes someone.
Creating accessible documents for students isn’t optional. Starting April 24, 2026, it’s required under federal law. Under the updated ADA Title II rule, public school districts must ensure their digital content meets WCAG 2.1 Level AA standards. That includes the documents teachers share with students, the PDFs uploaded to learning platforms, and the digital books students create themselves.
The good news: you do not need to overhaul everything overnight. You need a starting point and the right tools. This guide walks you through how to build accessible documents for students from the ground up — using Google Docs or Microsoft Word, Kami, and Book Creator.
Accessibility is not extra work. It is the work.
What the April 2027 ADA Deadline Means for Teachers
Most teachers have heard the phrase “digital accessibility” without knowing exactly what it requires of them. Here is the short version.
In April 2024, the U.S. Department of Justice finalized updates to Title II of the Americans with Disabilities Act. The updates require public entities, including public school districts, to ensure their digital content meets WCAG 2.1 Level AA standards. Most districts must comply by April 26, 2027. Districts serving populations under 50,000 have until April 26, 2028.
This rule covers websites and mobile apps, but it also extends to digital course materials, PDFs, presentations, and documents that students use to access programs and services. In plain terms: the files you assign matter.
The best response is not panic. It is practice. Teachers who build accessibility habits now protect their students, support compliance, and make their classrooms better for everyone.
Part 1: How to Create Accessible Documents for Students in Google Docs or Microsoft Word
Before an accessible document reaches a student, it has to be built correctly at the source. Whether you work in Google Docs or Microsoft Word, the following steps make the difference between a document that works for everyone and one that creates barriers.
Accessibility in Google Docs
- Use built-in Heading styles. Choose Heading 1, Heading 2, and so on from the Styles menu instead of manually changing font size or bolding text. Headings add structure that screen readers can follow, and they help learners navigate the document.
- Add alt text to every image. Right-click an image and select “Alt text.” Describe what the image communicates. If the image is purely decorative, leave the alt text blank.
- Use high-contrast colors. Avoid light text on light backgrounds, and don’t use color alone to communicate meaning. Learners with low vision or color blindness rely on strong contrast to read content.
- Write descriptive hyperlinks. Replace “click here” with link text that explains where the link goes, like “View the lab safety procedures.” This helps screen reader users understand the destination before opening it.
- Choose accessible fonts. Lexend, designed to improve reading fluency, is available in Google Docs via Google Fonts and is a strong choice for any classroom document.
Visit the Google support page for more tips on making accessible documents.
Accessibility in Microsoft Word
- Use the Styles panel for headings. Don’t create headings by changing font size. Use built-in Heading styles to create real document structure.
- Add alt text through Format Picture. Right-click an image, select “Format Picture,” and add a description in the alt text field.
- Run the Accessibility Checker before saving. Under Review, select Check Accessibility. Word flags missing alt text, heading issues, and other common problems. Fix each item before you share the file.
- Choose readable fonts and sizes. Lexend is also available in Word. Use at least 12-point body text, and avoid decorative fonts.
Get our one-page accessibility checklist to keep handy when creating your student Kami App activities.
Want to go deeper? Visit Section508.gov/create/documents for additional resources and technical guidance on creating accessible digital documents.
Part 2: Using Kami to Make Accessible Documents for Students
If you’re working to make documents accessible for every learner, you may already have the right tool in your workflow. In Kami, you can build on the accessible foundation from Part 1 with annotation, reading supports, and engagement tools.
Open Your Accessible Document in Kami
In Kami, open files directly from Google Drive or Microsoft OneDrive. If you apply proper heading structure, alt text, and semantic formatting in the source document, those elements carry into the PDF and continue to support screen readers and assistive technology in Kami. When you start with an accessible file, students begin with a document that works before any annotation starts.
Enable Accessibility Features Using Feature Control
Before students open an assignment, configure your Kami assignment settings using Feature Control. This is where you decide which tools are available to students for a given document. To create truly accessible documents for students, enable the following before distributing any assignment:
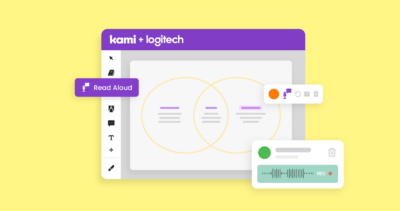
- Read aloud: Helps students and teachers by converting on-screen text into natural spoken audio.
- Text Box Tool: Enables students to type or speak responses directly on the document, supporting a range of expression modes.
- Voice typing: Reads document content aloud with synchronized highlighting, supporting students who struggle with decoding, multilingual learners, and students with visual impairments. Students can follow along and adjust reading speed independently.
- Predictive Text: Displays predictive options as you type. Requires a paid Kami plan.
- Audio and Video Comments. Allows students who have difficulty writing by hand or typing to respond to content using voice or video. This removes a significant barrier for students with motor differences, dyslexia, or writing challenges.
- Markup Tools: Give students multiple ways to interact with material without requiring text-based output.
To configure these settings, go to your Kami library, open the assignment, and select Feature Control. Enable the features above before the document goes to students.
Pair Every Document with a Voice Comment Prompt
When assigning text-heavy documents, pair them with an audio comment prompt so students always have more than one way to engage. This single habit aligns with UDL’s principle of multiple means of action and expression and gives every student a genuine access point, not just an accommodation.
Part 3: How to Create Accessible Books in Book Creator
Book Creator gives students a canvas for original and remixed creative works. With that creative power comes responsibility: the responsibility to design books that every reader can fully experience. When students make accessibility part of their process, they practice empathy and fulfill ISTE Student Standard 1.6.b, creating original and remixed works responsibly.
Get our one-page checklist to keep handy when creating your Book Creator books.
Here are nine ways students can build accessible documents and books in Book Creator.
1. Write Alt Text for Every Image
Every image tells a story. Students should add alt text that communicates the purpose of an image, not just its appearance. Book Creator includes an AI alt text generator to help students get started. They can review and refine the generated description to make sure it is accurate and contextually meaningful. If an image is purely decorative, leave the alt text field blank.
2. Check Color Contrast Before Publishing
Color choices affect readability for students with low vision or color blindness. Students can use Book Creator’s Inspector tool to find the hex codes for their text and background colors, then check contrast using a free tool like Adobe Color. If the combination does not meet accessibility standards, they adjust before publishing.
3. Proofread for Clarity
Accessibility includes clear communication. Spell check catches errors so writing is accurate and easy for all readers to follow. Teachers can enable or disable the spell checker in Library Settings depending on the assignment context.
4. Choose Readable Fonts and Layouts
Book Creator includes Lexend, designed to improve reading fluency, and OpenDyslexic, which supports readers with dyslexia. Encouraging students to use these fonts alongside short paragraphs, clear headings, and plenty of white space reduces cognitive load for all readers. Page templates in Book Creator provide ready-made layouts that support clean, consistent design.
5. Use Descriptive Hyperlinks
When students add hyperlinks, the link text should describe the destination. “Explore NASA’s Europa Clipper mission” tells the reader far more than “click here” and gives screen reader users meaningful navigation cues.
6. Record Voice Notes for Additional Support
Students can layer audio narration alongside written text. This supports decoding, benefits multilingual learners, and adds the author’s voice to the reading experience, offering multiple means of representation for every reader.
7. Add Captions or Transcripts for Multimedia
Any audio or video included in a book should be accompanied by captions or a written transcript. Book Creator also translates video captions and audio recordings into multiple languages, extending access for multilingual readers.
8. Avoid Overloaded Pages
Simpler pages are more accessible pages. Students should limit how much text appears on a single page, use white space intentionally, and avoid cluttered designs that create visual overwhelm or cognitive barriers.
9. Offer Multiple Ways to Engage with Content
Text alone is rarely enough for every reader. When students add diagrams, timelines, audio explanations, or drawings alongside written content, they make their books more accessible to readers with different learning profiles, strengths, and needs.
Why Accessible Documents for Students Are Good Teaching
The April 2026 deadline is a legal milestone. But the habits it asks teachers to build are just good pedagogy. When teachers create accessible documents and teach students to create accessible content, they are modeling what equitable design looks like in practice.
Kami and Book Creator from Kami were built with inclusion at the core. Book Creator recently earned the UDL Accessibility Product Certification from CAST, recognizing its ongoing commitment to inclusive learning environments. Kami’s Feature Control, text-to-speech, and annotation tools put real access directly in students’ hands, every day.
This support now extends beyond the classroom document; with Kami Companion, students can bring those same powerful accessibility features to any web-based resource they have access to. By using Kami Companion to read, understand, and navigate the broader web, students maintain a consistent, inclusive experience regardless of where their research takes them.
Accessible design is not a compliance checkbox. It is a commitment to every student in the room.
Frequently Asked Questions
As of April 24, 2026, public school districts must ensure their digital content meets WCAG 2.1 Level AA standards under the updated ADA Title II rule. This includes documents, PDFs, and digital course materials that students use to access programs and services.
Use built-in Heading styles for structure, add alt text to all images, write descriptive hyperlinks, use high-contrast colors, and choose readable fonts like Lexend. Then export as a PDF before uploading to Kami.
Kami’s Read aloud, Voice typing, Predictive text, audio and video comments, and markup tools, all support accessibility for students with different learning needs. Teachers can enable these through Feature Control before distributing any assignment.
Students can add alt text to images using Book Creator’s AI alt text generator, check color contrast with the Inspector tool, choose accessible fonts like Lexend or OpenDyslexic, add captions to multimedia, and offer multiple formats for content engagement.
Blogs you may also like
4 Ways Kami Can Make Your Assessments More Accessible

Audio and Accessibility in the Classroom

Boosting Accessibility and Inclusion with Kami